


Even though the whole brewing process requires a lot of attention, beer fermentation is the step where all the magic happens. During this operation, the yeast converts sugars into ethyl alcohol and CO2, giving the beer its alcohol content and carbonation.
After the malting, mashing, and boiling, the wort is ready to be transferred to a fermenting vessel. Once the wort is cooled, you can add the yeast so the process can start. If you are looking to get a clearer product, it’s better to break down beer fermentation into two phases: primary and secondary. This is especially recommended for homebrewers and any microbrewery to get rid of residual yeast, fruits, hops, or other residual beer ingredients.
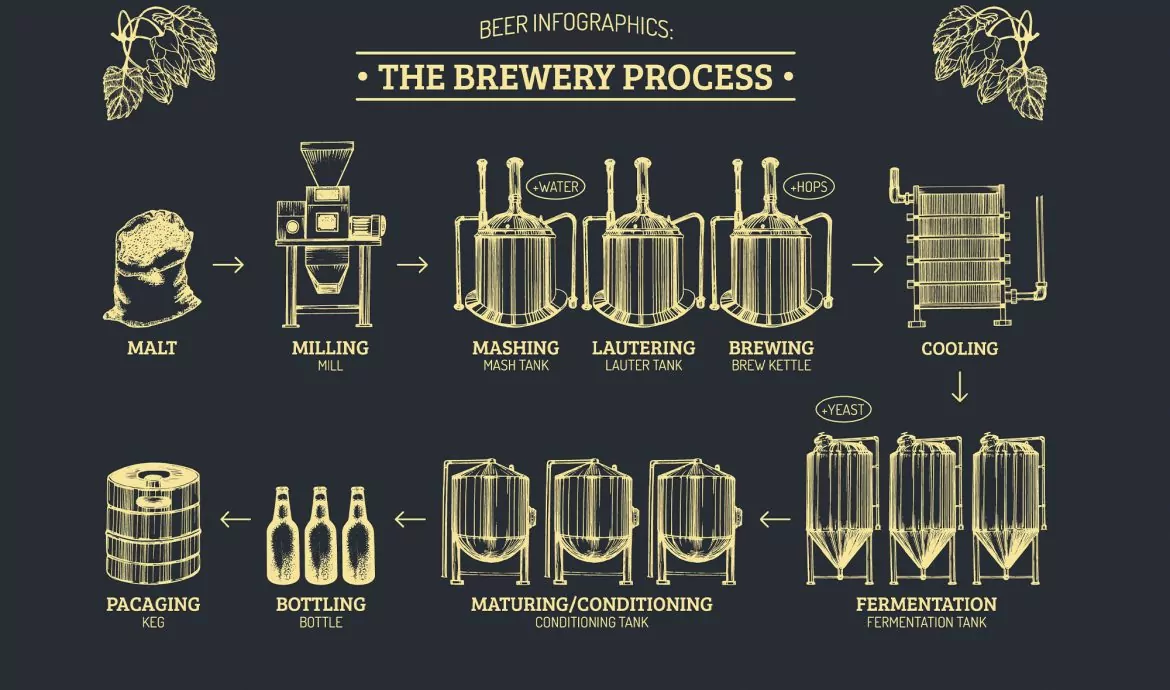
The beer fermentation process
Primary fermentation
As mentioned before, this is the moment you transfer the wort into a storage vessel with an airlock. “This valve will allow CO2 gases to escape while preventing outside air from entering” (Kegerator, 2014). And then you are ready to add or “pitch” the yeast.
Beer fermentation (See also: Microbrewery) starts one or two days after. How do you know? You will see bubbles in the airlock, which means sugars are turning into CO2 and alcohol. Also, a layer of thick foam will develop on top of the beer. This is called krausen. At the same time, the “trub”, particles of dead yeast cells, proteins, and hops, will sink to the bottom of the vessel.
Your primary fermentation will be complete when the bubbles slow down or stop entirely, and the krausen starts to subside. This process will take between one and two weeks, depending on the style of beer you’re making and the type of yeast you use.
Secondary fermentation
Now it’s time to “rack” the beer into a new and clean fermenter, leaving the “trub” behind. These particles might form again, but the final product will be more clear and less hazy.
Although second fermentation is not necessary, it is at this stage that the active yeast cells will convert into more complex sugars. This will increase clarity and improve the flavor profile. If you are planning on making fruit alcoholic drinks, this is the perfect moment to add additional beer ingredients. Since some fruits should not be subjected to heat, it’s better to use fruit purees or juices to avoid contamination. This type of beer is the go-to when looking for beer cocktails. One week will be enough for this phase to successfully be completed.
3 beer fermentation tips
Use fresh yeast
Like all living things, yeast will die. So, when you don’t use a fresh product, you take the risk of spoiling the beer fermentation process. Dry yeast is usable for one or two years, while the liquid kind only for three months.
Aerate the wort
Yeast requires oxygen for effective fermentation. In addition, to aerate the wort, you could let the yeast sit for at least 3 hours before pitching.
Temperature
To keep a healthy fermentation, you need to maintain the recommended temperature for the strain of yeast you are using. Lager beers, for example, need temperatures between 45-55ºF. Ales, on the other hand, thrive at 65-70ºF. “Typically, the cooler the temperature, the slower the yeast will work, and the warmer the faster” (The GrainFather, 2020).
Once beer fermentation is over, your brew should look clear and free of solid particles. The aroma, color, and body will depend on the style you are making. This is the moment you should see results. Before bottling, you can age the beer to achieve other outcomes.
References
ADVENTURE IN HOMEBREWING. (N.D.) 7 TIPS FOR A HEALTHY HOMEBREW FERMENTATION.
RETRIEVED FROM HERE
FLOWERS, J. (JULY 21, 2014). HOW TO BREW BEER: THE ULTIMATE STEP-BY-STEP GUIDE. KEGERATOR.
RETRIEVED FROM HERE
NORTHERN BREWER. (OCTOBER 23, 2018). HOW TO FERMENT BEER.
RETRIEVED FROM HERE
THE GRAINFATHER. (NOVEMBER 1, 2020) THE BEER FERMENTATION PROCESS.
RETRIEVED FROM HERE